Who Wants a Healthy Cookie?

Nibbles

Fruit thins and milk
Frankly, I think the point of cookies is not to be healthy, but it certainly doesn’t hurt to have a range of alternatives. After all, sometimes an apple or orange just doesn’t satisfy the way of baked treat can. Still, the trend of marketing snack foods as healthy or good for you just makes me roll my eyes.

So it was with a certain amount of both curiosity and skepticism that I tried Newtons Fruit Thins, Fig and Honey.

Let’s take this from the top down, shall we?

The package touts “made with real fruit” as opposed to what–fake fruit? One would certainly hope that it’s made with fruit as opposed to chemicals, but is it made with either figs or honey?

Turns out: yes. The ingredients list reads:

Unbleached enriched flour*, sugar, whole grain wheat flour, soybean and/or palm oil, rolled oats, dried figs, raisins, honey, salt, baking soda, rice flour, soy lecithin, natural flavor (contains cinnamon).

*I left out the bracketed enriched bits for the sake of clarity.

I also noticed a few other things. While enriched flour is one of those borderline ingredients (why pump vitamins in when they can be achieved through other ingredients goes the argument), sugar, salt and baking soda are all simple, understandable ingredients–the same ones we bake with in our own kitchens. Not too bad, Nabisco, not too bad.

So they seem fairly simple cookies, which I definitely prefer, but they’re still cookies. Emphasizing the words “fruit” and “thins” on the package doesn’t take away from the fact that they are a snack and not a building block of a healthy diet.

But how do they taste?!

At first I couldn’t put my finger on it–the flavor reminded me of something familiar but it wasn’t immediately recognizable. They are crisp–even several weeks after opening the package they were still crisp and not stale–and studded with bits of dried figs and sweet without being too sweet. In fact, the only downside of that first cookie was that the figgy bits were so dense that they can easily get stuck to your teeth. Still, once you’ve encountered the first one you tend to bite more carefully and the problem is avoided.

When Todd got home and I had him taste one, it finally clicked what the scent and flavor reminded us of: oatmeal raisin cookies. Now, we happened to really like oatmeal raisin cookies so this was a good thing.

As tasty as the cookies are on their own–and they are!–I can see these wafer-style cookies being used in a number of sweet and savory sandwiches. Filled with a sweetened boursin cheese or a salt chevre they’d make a nice little afternoon or late-night snack. Maybe even use them for s’mores instead of graham crackers!

Would we buy these over our chosen cookie indulgence, the mighty Oreo? Probably not as a general rule. But if I were looking for something tasty and non-chocolate for a road-trip snack or just wanted something different, Newtons Fruit Thins are a little higher on the list than they would have been.

Have you tried this or any of the other flavors of Newtons Fruit Thins? What did you think?

~~~oOo~~~

As part of the FoodBuzz Featured Publisher Program I was sent a free package of the product to try. All opinions are my own.

Tales of a Party: Fairy Fest 2011

Nibbles

Have you ever had a party with low attendance because everyone else had the same party date? Happens all the time with all the big holidays and some of the smaller ones, too.

Next time, be the happy guest at your friend’s party and let open your own home for a lesser-known holiday on another weekend.

One suggestion? Late June gives us the longest day of the year (well, at least the one with the longest amount of daylight) on the Summer Solstice, a holiday also known as Midsummer (or Letha) in some circles.

This year was our 2nd Midsummer Fairy Fest and Frolic, with an evening start time (to take advantage of the late-day sun while escaping some of the late-June heat), plenty of lighting for when the sun did go down and a small bonfire (we’re under a burn ban due to drought, so the fire pit had to do instead of the larger one we’d hoped to have). Music played from a well-concealed iPod and fairies frolicked around the yard. (Why fairy fest? Lore has it that fairies are more easily seen at the Solstice, if you know where to look!)

Photo collage of Fairy Fest decorations

Guests were encouraged to come in costume if they felt so inclined, and there was plenty of sun and fairy-focused foods to nosh on while enjoying each other’s company.

Photo collage of food pictures from Fairy Fest 2011

(click for a better--larger--view)

Since it does tend to be infernally hot, even in June these days, I wanted to keep the menu light but tasty. Some guests were a bit put out that my usual bacon and potato-laden goodies didn’t make it onto this party menu, but that was before they tasted what new dishes we served up!

The Menu

  • Sliced ham, sliced roast beef and Fruited Chicken Salad served with a variety of breads (Parker House Rolls, Potato Rolls, Mini Corn Muffins and Marigold Buns*) as well as mayonnaise, whole-grain mustard and creamy horseradish as a make-your-own sandwich bar.
  • Vegetables were represented by Carrot Fritters*, Mushroom & Minted-Pea Beggars Purses*, Roasted Red Pepper and Garlic Hummus with Pita Crisps, Floral Cheese Tartlets* and Spinach Puffs.
  • Desserts were kept light and simple with a variety of melons, Fairy Cakes*, Cornish Saffron Cakes* and S’mores fixings.
  • In addition to several beers and lambics, we also had homemade Limoncello, Lemonade and Sun-Worshipper Punch to keep everyone nice and hydrated.

A lot of the menu items (everything marked with an asterisk–though the beggars purses were a blend of 2 recipes) came from a book I picked up some time ago: Celtic Folklore Cooking by Joanne Asala. What’s fun about this book is that in addition to some out-of-the-ordinary recipes, stories and lore, each recipe notes which holiday (of those in the Celtic wheel of the year) it is appropriate for–making planning a party like this much easier!

The surprise favorites were the Carrot Fritter and the Floral Cheese Tartlets–my baby brother happily ate flowers!  Of course, not everything was a hit. The Cornish Saffron Cakes were more like dense biscuits and were less than favored. Oh, well, for trying so many new recipes for the party, having only one dud is still pretty good odds.

What out of the ordinary holidays do you like to celebrate?

This coverage of Fairy Fest 2011 is being linked up with the CSI Project: Parties and Picnics Challenge!

Visit thecsiproject.com

MCC: Lemon Hart

Nibbles
Lemon Hart metaloaf

Lemon Hart

This month’s recipe comes to us from (the translated) The Sensible Cook: Dutch Foodways in the Old & New World (relatively speaking, of course), and dates back to 1669.

To Prepare a Lemon-Hart

Take minced veal just like for meatballs, add to it nutmeg, pepper and salt as well as peels of a fresh lemon cut into small pieces, for each pond of meat an egg yolk, a crushed rusk and mix it all together, shape it in the form of a large meatball or in the form of a heart, stew it with a little water. When done take off the fat, add Verjuice, butter, and peels of a salted lemon which has been boiled together, then dish up; a sauce is poured over made from Verjuice beaten with egg yolks.

Medieval Vocabulary 102

pond = approx. 430 grams which is, roughly, 15.16 oz–close enough to a pound that we’re going to call it even
rusk = the heel end of a loaf of bread, toasted
Verjuice = a tart condiment from unripe grapes, we substitute apple cider vinegar or wine vinegar (though it can be ordered online)
salted lemon = a type of preserved lemon; I have a quickie version of this that I’ll put below, but you can find preserved lemons at some specialty stores, too.

Basically we’re making a meatloaf, here, with ground veal if at all possible. If you can’t get or prefer not to use veal for whatever reason, very lean beef–the best quality you can afford–will be fine. You can also use venison (hart is another name for deer, after all), though it may be a little drier. The thing to notice with this recipe is that they made meatloaf much the way we would: mix up the meat with seasonings, an egg and some breadcrumbs and “bake”. Instead of ketchup or tomato sauce on top, it uses a tart egg sauce and also comes with it’s own gravy* thanks to the liquid added during and just after cooking.

Ingredients, to serve 6-8

2 lbs ground veal
1 tsp nutmeg
½ tsp pepper
1 tsp salt
2 Tbsp lemon zest
2 egg yolks
2 heels of bread, toasted and crumbled, or more as needed
1 cup warm water
For the gravy 

1 Tbsp apple cider or wine vinegar
2.5 Tbsp butter
the minced skin of one salted lemon


For the topping

2 tsp apple cider or wine vinegar
3 egg yolks

This manuscript describes a sort of basic stove one could fashion in the mid 1600s so while we might make this meatloaf in the oven, an alternative is to cook it on the stove over a low heat (hence the water added to the cooking vessel, making this more of a braised loaf). I’ve little doubt such loafs were made in a pot over flame (as minced meats won’t very well stay on a spit unless otherwise contained) as a large meatball for many years before we had modern stoves and ovens. If you have a Dutch oven or other vessel that can be used in both the oven and on the stove-top, you could split the difference and bake it in the oven per your usual meatloaf and then finish it on the stove.

Method

the ingredients for the lemon hart Combine the ground meat, seasonings, eggs and coarse bread crumbs. Shape into a large ball or decorative heart-shape and place in the bottom of a Dutch oven or roasting pan. Add 1 cup warm water to the bottom of the pot or pan and place over medium heat on the stove, covered, or in a 350°F oven for 1 hour or until the center of the load has reached 160 degrees Fahrenheit.
the cooked lemon hart, before deglazing or saucing Remove the lid and skim off any fat that may have accumulated in the pan. Add the apple cider or wine vinegar, butter and salted lemon zest and bring to a boil. (This is akin to modern chefs de-glazing a pan to make a rich gravy from the caramelized bits on the bottom.)
the sauced lemon hart Whisk together the topping ingredients (apple cider or wine vinegar and egg yolks) and pour over the loaf while still warm. (Between the heat of the load and the acid in the vinegar, the egg yolks will be cooked enough for safety. If you’re still concerned, you can whisk the topping over steaming water (a double boiler) until warm and the egg yolk coats the back of a spoon.)
Lemon Hart metaloaf Carefully transfer the Lemon Hart to a serving dish (I used 2 large spatulas and had a person standing by with the plate to quickly slip it under) and the gravy to a bowl. Let rest a few minutes before slicing and serving.

In the past I’ve baked this but decided to give the stove-top method a try this go ’round. On my electric stove I had to keep the heat down medium-low to prevent the liquid from boiling furiously and, even then, it took barely an hour to reach the right temperature.

Served with roasted new potatoes it made an excellent supper–the lemon is obviously there but not so overpowering as to make it unpleasant. You do want to make sure you only use the lemon zest and avoid the pith of the salted lemons–the preserving softens it a lot, making it much easier to remove.

Lemon Hart and Roasted New Potatoes

Meat and Potatoes Supper

*Because I let it go a smidgen too long, the gravy was non-existent, but the Lemon Hart was still moist and tasty so it wasn’t a great loss.

The next recipe for the Medieval Cooking Challenge will go out this weekend: sign up to get in on the scoop!

~~~oOo~~~

Quick Salted Lemons

There are several recipes out there for salted lemon preserves that are a common condiment in Middle Eastern food but they take several weeks to prepare. When I first did this recipe I didn’t have that kind of time so here’s what I came up with, instead.

Lemons, scrubbed clean of any waxes or residue
Kosher Salt

In a baking dish just larger than the lemon(s) you want to “preserve”, pour in a layer of Kosher salt, arrange the lemon(s) on top and pour more salt around them. Cover and bake in a 250F oven for 2 hours. Remove and let cool.

Pack the lemon(s) and salt in a fridge-safe container with a tight lid and they’ll keep for months.

Or, if you’re really in a hurry, split each lemon in quarters, lengthwise, but don’t cut all the way through one end. Sprinkle salt into the cut lemons, place in a microwavable container with additional salt, microwave for 2 minutes and then let cool. Store 1 night in the fridge, shaking or turning the container at least once, before using.

Tallahassee, FL: Sustainable Food Petition

Nibbles

During my trip to the farmers’ market, this past weekend, I was asked to sign an atta-boy petition to the Commissioner of Agriculture, Adam Putnam. Commissioner Putnam is small-farm friendly and the goal is to let him know that we appreciate those considerations–as customers of local farms–and encourage more of these sorts of changes to make it easier for small farms to sell directly to consumers while keeping everyone safe.

Some examples of the initiatives that the organizer of the petition, Malini Ramanarayanan of the Red Hills Small Farm Alliance, Inc., was able to provide me with were reducing the restrictions school systems were under so that they would be able to purchase from local farmers as well as looking at safe alternatives for small farms to sell eggs at farmers’ markets (the current regulations require a washing station far beyond the needs and budgets of small producers).

The market was absolutely bursting, Saturday, with plenty of farmers and shoppers milling around under the pavilion. As I’ve said before, I love finding new-to-me vegetables and having more variety than the local chain groceries carry–without the farmers market I wouldn’t have that access! I was happy to sign the petition and encourage my local readers to do the same.

Thank You for Supporting Small Farms – Keep it up!

Dear Commissioner Putnam

I applaud your administration for paying attention to small farms. Fresh, local food is important to me, so I urge you to implement changes that will minimize costs for small farms while ensuring food safety.

By driving Healthy Schools for Healthy Lives and continuing the work of the Food Safety and Food Defense Advisory Council Small Farm Subcommittee, your administration has shown critical support for small farm enterprises. This will ensure that hard working small farmers not only provide safe healthy food to their communities, but also make a healthy profit and sustainable living.

Keep up the good work! Please continue to support opportunities and “right-size” regulations that impact small farm enterprises in our great state.

Click here to Sign at Change.org

Not in Florida? How about finding your own Commissioner of Agriculture and letting them know your thoughts on small farms?

ICC: Khara Biscuit

Nibbles

It’s June 15th and time for another foray into the Indian Cooking Challenge! This month we have a spicy, savory shortbread called a Khara Biscuit from the recipe files of Champa. Unlike the fluffy, leavened biscuits we’re familiar with, this unleavened biscuit is more of a cookie. Studded with chiles and cilantro they make a nice snack or accompaniment to a meal.

Khara Biscuits

Iyengar Bakery-style Khara Biscuit

Ingredients:
2 cups All-Purpose Flour
1 tsp Salt
6 Green Chiles, finely diced
3 Tbsp chopped Cilantro
6 Tbsp Butter, softened
4 tsp Sugar
3 Tbsp Plain Yogurt, plus more as needed (I used a total of 6 Tbsp, I think)

Putting it all together:

Preheat your oven to 325° Fahrenheit and line 2 baking sheets with parchment paper.

Mixing the dry ingredients In a bowl, whisk together flour and salt. Toss in the chopped chiles and cilantro until both are coated with a fine layer of flour and set aside.
The creamed butter and sugar, adding the yogurt In the bowl of an electric mixer, cream butter and sugar together until light and fluffy.

Add the yogurt and continue to beat until fully incorporated.

The fully-mixed dough With the mixer on low, add the dry ingredients and mix slowly, adding more yogurt as needed to get a dry but workable dough. Be careful not to overwork the dough as it could become tough.
Forming the biscuits without a cookie cutter The original recipe suggests rolling out to dough to 1/4″ thick and cutting them with round cookie cutters. I found the dough difficult to roll so opted to scoop even portions of the dough and flattened them with my hands.
The finished biscuits, top and golden-brown bottom Bake for 18-20 minutes, rotating the pans halfway through cooking. They’ll stay pretty pale but the bottoms will turn golden brown. Depending on the thickness of your biscuits, they may need a little more than 20 minutes (mine took about 25).

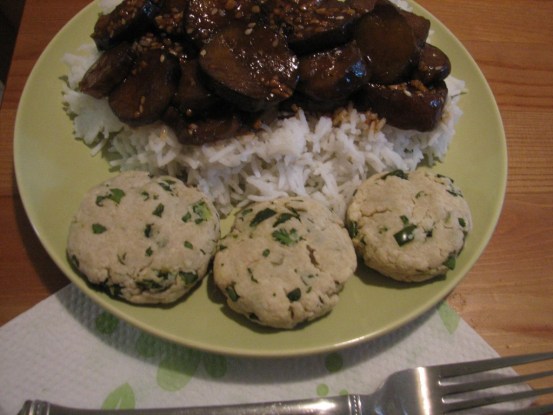
The original recipe mentioned using mint in place of the cilantro and I might have to make them again, just to try it out. The spicy cookies were a nice counterpoint to the sweet-garlic-eggplant we had that evening for dinner.

Khara Biscuits with Spicy Garlic Eggplant